Intentionally making grooves with drum kits
Sound selection, the pattern, velocity hierarchy, drummer logic, and the glue chain.
Drums before melody, drums before bass
The groove is the track's DNA. Bass rhythm, stab placement, vocal chops — everything locks to it.
Program the kick-clap-hat core first. Get it grooving solo. Then write parts that sit inside its pockets.
The genre truth: house is "an 8-bar loop played for six minutes."
The interest comes from phrasing — what comes in and drops out every 8, 16, 32 bars, and the fill that announces each change.
Not from a busy pattern. The listener is supposed to lock in, not be entertained. Simple hypnotic groove; the arrangement tells the story.
Sounds that belong on one record
Pick sounds that belong on one record — same era, same character.
All 909-style, or all dusty acoustic. Mismatched sounds read as separate layers, not one kit.
909 is the tech-house default: punchy kick, tight closed hats, snappy clap. Start there; break the rule on purpose.
Complete the sound, don't stack it
Layer to complete a sound, not to stack sounds.
Kick = sub + body + click. Clap = body + snap + tail. Three layers max per hit.
Phase is the #1 layering killer. Phase = two layered sounds cancelling each other out in the lows, ending up weaker than one sample alone.
Fixes, in order: 1. Flip the polarity on one layer (Utility's invert switch — it turns the waveform upside down). 2. Zoom in and nudge one layer ~0.5 ms. 3. Make sure the samples start cleanly.
Pitch is a decision, not an accident
Tune kicks, toms, congas, and pitched percussion to the track's key — the root, the fifth, or the octave.
Practical method: loop a bell-shaped EQ band at the target note. Pitch the sample until it sits inside it. Then turn the EQ off.
One school tunes the kick's main pitch to the root. Another puts it a key away from the sub to dodge phase problems. Either way — it's on purpose.
Kick-clap-hat, then the groove layer
Kick four on the floor (steps 1, 5, 9, 13). Clap on 2 and 4 (steps 5, 13). Closed hats on the offbeat 8ths (steps 3, 7, 11, 15). Open hat layered underneath for air.
Then the groove layer: 16th hats and shakers. Accents land on the kick hits. Quiet swung notes sit between.
The hats are where the feel lives.
Give each percussion sound its own lane. Congas on one pattern, shakers on 16ths, rimshots and claves on the syncopated accents. They should interlock, not pile up.
If two percussion parts play the same 16ths, delete one or move it.
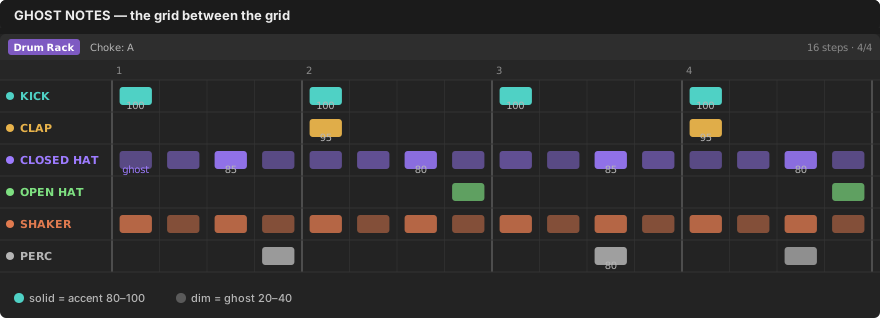
Diagram: built for this lesson
Flat velocity = instant machine
Velocity = how hard each hit lands — its loudness.
Kick and clap accents: 80–100%. Regular hats: 50–70%.
Ghost notes — very quiet 16ths between the main hits — at 20–40%: felt, not noticed.
The accent pattern: the first 16th of each beat hits hardest ("CAT-ter-pil-lar"), like alternating drumsticks.
Try 8ths at 95-65-85-60-90-68-82-58, then ±5–10 of random on top.
Ghost notes create push without adding density.
Shape velocity before touching timing. It does more for feel than any nudge.
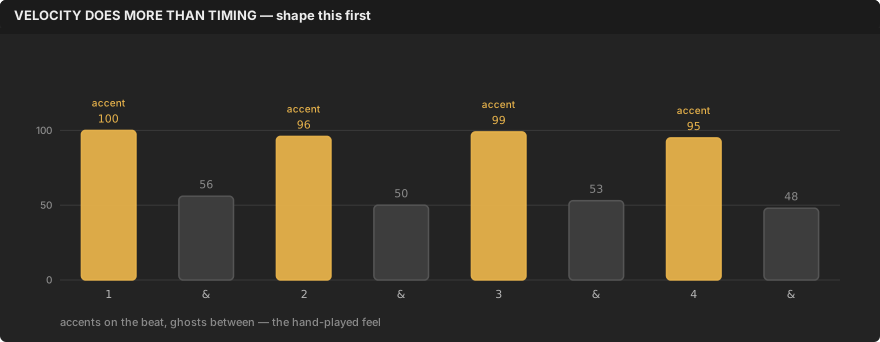
Diagram: built for this lesson
A hat can't be open and closed at once
A real hi-hat can't be open and closed at the same time. When the open hat plays, the closed one stops.
Program it that way: put both in the same choke group (a setting where one drum sound cuts off the other). It happens automatically.
This one detail is what makes a pattern read as hi-hats instead of noise.
The hand has to move
A drummer hits the crash with the hi-hat hand, then goes back.
So the hat usually misses the downbeat where the crash lands. Leave that gap in.
The physical-limits rule
A drummer has 4 limbs. Two are busy with the kick and the hi-hat pedal.
So at most 3 or 4 pieces sound at once, usually 1 or 2. If your programming needs an octopus, thin it out.
Too many simultaneous sounds register as "wrong" even to listeners who can't say why.
Kick + snare first
Kick + snare first. That's the lock. Then hats, then percussion.
Let the pieces trade phrases: toms answer the snare, kick answers the hats. Don't run everything at once.
And leave space: most of a great groove is silence. The notes you skip define the ones you keep.
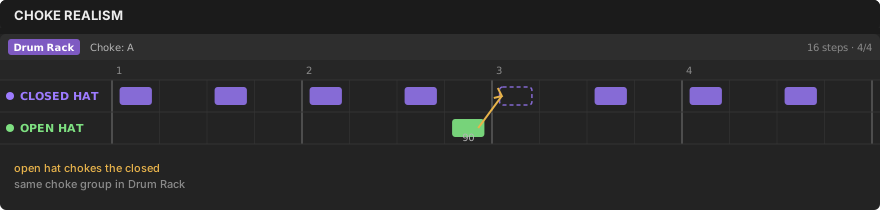
Diagram: built for this lesson
Samples come from a million sources; a band gets cohesion free
You build the room with the bus chain.
Saturator ~30% — saturation adds harmonics. The "same circuitry" feel across different samples.
Drum Buss ~24% — Ableton's drum-glue device: drive, crunch, and boom in one.
Transient shaper under 3 dB — it shapes the attack of each hit. Tighten or sharpen.
Glue Compressor in parallel ~50% wet — parallel means blended next to the dry signal. The punch survives while the kit gels. Slow-ish attack ~10 ms, auto release, ratio 2:1–4:1, 2–4 dB of gain reduction.
A touch of high-end saturation for air.
Short dark reverb on a return — a shared echo space you send the drums to. Barely audible. Highs and lows rolled off so it stays out of the way.
A/B the chain on and off. If you can't hear the glue working, it's either perfect or pointless.
Warning: whole-bus compression is easy to overcook. Less is more.
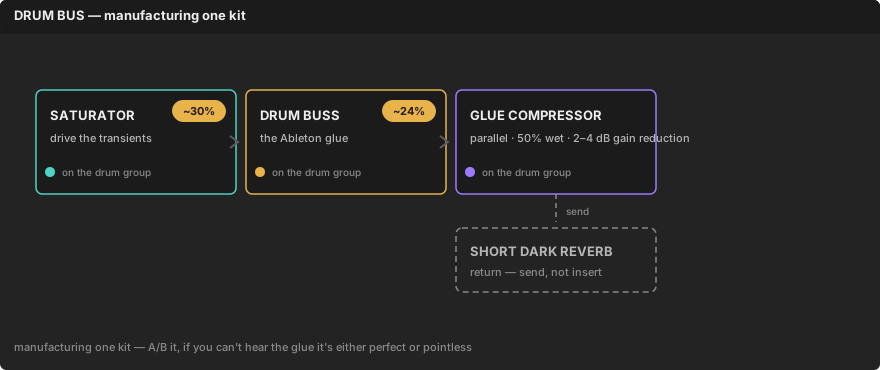
Diagram: built for this lesson
Living hats
A Velocity device before the rack with a little Random keeps hats breathing.
Random in pitch mode cycles between layered samples.
Arpeggiator for programming rolls.
Fast auditions
Drum Rack can randomize or replace all its samples — or lock the pads you like while rolling the rest.
Try kits fast without losing the keepers.
Your personal library
Right-click any loop → Extract Groove(s) → apply it to your programmed MIDI from the Groove Pool.
Build a groove library from tracks you love. Adjust Timing, Velocity, and Random each time.
Force the arrangement
When the loop grooves, record the track's own output as new audio (Audio From: Resampling).
Arrange with the audio — chop it, reverse it, re-pitch the fills, commit.
Audio forces arrangement decisions that MIDI lets you postpone.
Every layer must earn its place
Mute it. If nothing changes, delete it. Three layers max per hit.
The robot combo
100% snap-to-grid plus one loudness for everything is the single biggest amateur tell.
Humanize the hats most, the kick least.
Too many sounds in one band
Three percussion parts all living at 2–5 kHz = mud.
Carve each its own lane with EQ. If two sounds want the same space, one of them goes.
Land the downbeat
16th-note snare rolls every 8–16 bars announce the section change.
But the fill has to land back on beat 1 with authority. Or it reads as a mistake.
Check polarity first
Layered kick suddenly has no punch?
Flip one layer's polarity before you touch EQ.
Two noise generators
Open and closed hats playing at the same time is the fastest way to sound like machines instead of a hi-hat.
No chain rescues wrong samples
"It all adds up but it starts here, with the actual music and the source sounds that fit it."
Get the sounds right first. The bus chain is glue, not surgery.